Follow my previous post for the method to setup your initramfs build directory. For me it will be /media/work/initramfs. Make a note of this path(or the one that you have setup). We will need this later while configuring the kernel.
Make sure you have the kernel Source installed. I won't be guiding you about the distribution specifics on how to install a kernel source. You can download from kernel.org or apt-get it or installpkg. Its your choice. usually you will find the source in /usr/src/linux
We need to configure the kernel. I prefer to use the configuration for the Slackware huge-smp kernel, only because it has most of the needed modules built-in, you can opt to configure everything manually if you want.
If you are not running Slackware you can obtain the config from http://ftp.ua.freebsd.org/pub/slackware/slackware-current/kernels/hugesmp.s/config
Now lets start configuring the kernel source so that we can let it know where we have our initramfs source files
$ wget http://ftp.ua.freebsd.org/pub/slackware/slackware-current/kernels/hugesmp.s/config -O /usr/src/linux/.config
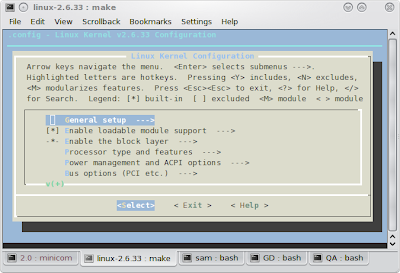
This will load the ncurses based kernel configurator. This is how it will look like.
$ make menuconfig
 Now select the "General setup --->" option from this page. This opens a new page.
Scroll down to the section "[*] Initial RAM filesystem and RAM disk (initramfs/initrd) support"
Make sure that the brackets before this has [*]. You will have it by default if you downloaded the config file from the link above.
The line exactly below this is the one we need to worry about.
() Initramfs source file(s)
Move your highlight bar on this and press Enter. This brings up an input prompt where you type the path of the initramfs source files. In my case it will be "/media/work/initramfs". Make sure you are typing it without the quotes. Now press Enter.
This should now change to
(/media/work/initramfs) Initramfs source file(s)
Optionally you can enable initramfs compression mode. To do this scroll down two lines and select
In the new page that comes up, select the compression mode that you like.
Built-in initramfs compression mode (None) --->
Now Press ESC key twice so that you are taken to the main page. Press them twice Again. You will prompted to save the changed configuration. Select Yes.
You will be taken back to the shell.
Now is the time to build your kernel.
at the command prompt type
$ make
The kernel takes a long time to build, so it would be good if you go have your meal or watch a movie. ;)
After this has finished type the following command to install all the modules.
$ make modules_install
The compiled kernel will be in /usr/src/linux/arch/c86/boot/bzImage. Let us copy it to /boot
$ cp /usr/src/linux/arch/c86/boot/bzImage /boot/vmlinuz-with-initramfs
We now need to create a bootloader entry.
As in the earlier post, I'll use Lilo. You can use your boot loader of choice.
My new /etc/lilo.conf entries for this new kernel will be
Image = /boot/vmlinuz-with-initramfsYou will note that I am not using an "initrd=" line over here. That is because I do not need to. The initrd is now built into the kernel. so we only need one file, the kernel to do our task.
root = /dev/sda1
label = TestInit
append = "home=/dev/sda6 etc=/dev/sda6 root=/dev/sda1"
read-only
Now simply run lilo to install the changes and reboot the machine.
During the boot prompt select TestInit and you will boot just like you did earlier with the separate /etc
No comments:
Post a Comment