Friday 17 September 2010

Adding NETBIOS lookup support to "ping"

A guy today asked in the Linux community why he was not able to ping Windows machines by using just their Windows hostnames from Linux when he could do the same from windows. So I decided to write this small HOWTO for others who might be asking the same question.

Most Linux distributions come with the ping utility, but unlike the Windows ping command, it does not get replies if we used a Windows HOSTNAME or NetBIOS name.

The usual workaround most people would do is add the hostnames in their Linux machine's /etc/hosts file in the format

IP.AD.RE.SS hostname

Example:
192.168.1.15 winfoo
But this will become too cumbersome to maintain when the machine's IP Address changes or when there are too many hosts for you to handle manually. The other option is a local DNS but that is unnecessary in a small network.

The simplest solution to this lies in the nsswitch.conf configuration file.

Open the file with your favourite Editor (you need to use sudo or be root to edit) and look for a line that begins with "hosts:". On my system this was:

hosts: files dns
Just add the wins at the end. So my line will be

hosts: files dns wins
Now try pinging a windows Machine using only the windows Hostname and it should be working all fine.

Monday 15 March 2010

Building Initramfs in the kernel

If you read my last post regarding Booting with /etc in a separate partition, you may have noticed that the initrd is specified as a separate file. Although this is good, there is a way to have it built into the kernel.

Follow my previous post for the method to setup your initramfs build directory. For me it will be /media/work/initramfs. Make a note of this path(or the one that you have setup). We will need this later while configuring the kernel.

Make sure you have the kernel Source installed. I won't be guiding you about the distribution specifics on how to install a kernel source. You can download from kernel.org or apt-get it or installpkg. Its your choice. usually you will find the source in /usr/src/linux

We need to configure the kernel. I prefer to use the configuration for the Slackware huge-smp kernel, only because it has most of the needed modules built-in, you can opt to configure everything manually if you want.

If you are not running Slackware you can obtain the config from http://ftp.ua.freebsd.org/pub/slackware/slackware-current/kernels/hugesmp.s/config


$ wget http://ftp.ua.freebsd.org/pub/slackware/slackware-current/kernels/hugesmp.s/config -O /usr/src/linux/.config
Now lets start configuring the kernel source so that we can let it know where we have our initramfs source files

$ make menuconfig
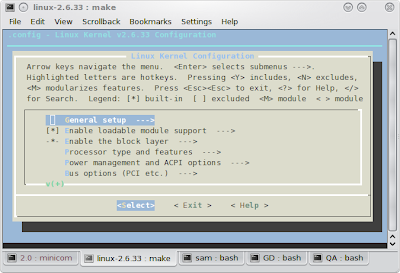
This will load the ncurses based kernel configurator. This is how it will look like.

Now select the "General setup --->" option from this page. This opens a new page.

Scroll down to the section "[*] Initial RAM filesystem and RAM disk (initramfs/initrd) support"

Make sure that the brackets before this has [*]. You will have it by default if you downloaded the config file from the link above.

The line exactly below this is the one we need to worry about.

() Initramfs source file(s)


Move your highlight bar on this and press Enter. This brings up an input prompt where you type the path of the initramfs source files. In my case it will be "/media/work/initramfs". Make sure you are typing it without the quotes. Now press Enter.

This should now change to

(/media/work/initramfs) Initramfs source file(s)

Optionally you can enable initramfs compression mode. To do this scroll down two lines and select


Built-in initramfs compression mode (None) --->
In the new page that comes up, select the compression mode that you like.

Now Press ESC key twice so that you are taken to the main page. Press them twice Again. You will prompted to save the changed configuration. Select Yes.

You will be taken back to the shell.

Now is the time to build your kernel.

at the command prompt type
$ make

The kernel takes a long time to build, so it would be good if you go have your meal or watch a movie. ;)

After this has finished type the following command to install all the modules.

$ make modules_install

The compiled kernel will be in /usr/src/linux/arch/c86/boot/bzImage. Let us copy it to /boot

$ cp /usr/src/linux/arch/c86/boot/bzImage /boot/vmlinuz-with-initramfs

We now need to create a bootloader entry.

As in the earlier post, I'll use Lilo. You can use your boot loader of choice.

My new /etc/lilo.conf entries for this new kernel will be

Image = /boot/vmlinuz-with-initramfs
root = /dev/sda1
label = TestInit
append = "home=/dev/sda6 etc=/dev/sda6 root=/dev/sda1"
read-only
You will note that I am not using an "initrd=" line over here. That is because I do not need to. The initrd is now built into the kernel. so we only need one file, the kernel to do our task.

Now simply run lilo to install the changes and reboot the machine.

During the boot prompt select TestInit and you will boot just like you did earlier with the separate /etc

Thursday 11 March 2010

Booting with /etc in a separate Partition

A friend of mine(Tejas Surve) had this question. "Is it possible to boot a linux system with having /etc in a separate partition?" He buzzed about it. A friend of his replied that it can't be done and he even blogged the reasons for it. I chose to disagree and found a solution, after all the beauty of opensource is that it can be bent and moulded to do what you want, the way you want.

So how is it done? This requires the use of initramfs or initrd. Most of the Ubuntu users may be using initrd by default. You can verify this by checking your menu.lst and looking for the line "initrd="

Initramfs or initrd are very commonly used with small kernels which do not have al the modules preloaded so that they can be loaded before additional tasks can be performed. This sometimes also includes loading the filesystems modules for mounting partitions. At this point the root (/) of the system is residing in memory and hence they do not need the hard drive's / or /etc for anything. The kernel has booted and hence it passes control to the init script on the initramfs which it loaded during booting and this script does the additional admin work that we need to do before passing control over to the real init which lies in /sbin/init on our Hard Drive, which in turn would require the /etc/inittab to function. This is how many systems without HardDrive boot off a network drive.

With the theory behind this done, let me explain how I did it. As most of you know, I use Slackware-current and my choice of kernel has always been the huge-smp flavour. For those who do not know, the huge-smp kernel is a kernel compiled with all or most of the modules as built-in and not as a module. This causes the size of the kernel to be huge(hence the name). Hence I usually do not need an initrd/initramfs. Just in case you do not have a huge-smp kernel, you can get it from http://ftp.ua.freebsd.org/pub/slackware/slackware-current/slackware/a/kernel-huge-smp-2.6.33_smp-i686-2.txz This is a slackware archive but you can extract with tar xvf filename command. Copy the vmlinuz.* file to your boot and use it accordingly.

Although I could use the mkinitrd to create my intramfs image, I chose not to and used a guide from http://jootamam.net/howto-initramfs-image.htm with some modifications.

Creating the folder structure

As discussed in the blog link above I created the folder structure, but I chose to create a /dev folder as well.


$ mkdir -p work/initramfs/{bin,sbin,dev,etc,proc,sys,newroot}
$ cd work
$ touch initramfs/etc/mdev.conf

Installing Busybox

We need a shell to do anything, hence we can install busybox for this.

$ wget http://jootamam.net/initramfs-files/busybox-1.10.1-static.bz2
$ bunzip2 busybox-1.10.1-static.bz2
$ mv busybox-1.10.1-static initramfs/bin/busybox
$ chmod +x initramfs/bin/busybox
$ ln -s busybox initramfs/bin/sh

The /init script

The real magic is played by the init script. It will first mount the root and etc partition and then switch to the real root and pass on control to the real init script located at /sbin/init on our Hard Drive

Let us setup the script by running the following commands

$ touch initramfs/init
$ chmod +x initramfs/init


The init script which I created is different from the init script given in the blog above, So I will paste my copy here with some explanations:


#!/bin/sh
busybox --install -s
#Mount things needed by this script
mount -t proc none /proc
mount -n devtmpfs -t devtmpfs /dev && mkdir /dev/pts
mount -t devpts devpts /dev/pts
mount -t sysfs sysfs /sys

echo /sbin/mdev > /proc/sys/kernel/hotplug

#Function for parsing command line options with "=" in them
# get_opt("init=/sbin/init") will return "/sbin/init"
get_opt() {
echo "$@" | cut -d "=" -f 2
}


#Defaults
init="/sbin/init"
root="/dev/hda1"

#Process command line options
for i in $(cat /proc/cmdline); do
case $i in
root\=*)
root=$(get_opt $i)
;;
init\=*)
init=$(get_opt $i)
;;
etc\=*)
etc=$(get_opt $i)
;;
home\=*)
home=$(get_opt $i)
;;
esac
done

#Mount the root device
if [ -n "${root}" ]; then
mount "${root}" /newroot -o ro
echo mounted real_root
fi
if [ -n "${etc}" ]; then
mount "${etc}" /newroot/etc
echo mounted etc
fi
if [ -n "${home}" ]; then
mount "${home}" /newroot/home
echo mounted home
fi

#Check if $init exists and is executable
if [[ -x "/newroot/${init}" ]] ; then
#Unmount all other mounts so that the ram used by
#the initramfs can be cleared after switch_root
umount /sys /proc

#Switch to the new root and execute init
exec switch_root /newroot "${init}"
fi

#This will only be run if the exec above failed
echo "Failed to switch_root, dropping to a shell"
exec sh


If you compare this script with the original script from the blog you will notice many differences.
I haven't used mdev at all. Instead I mount /dev as devtmpfs.
You will notice some additional cases in the for loop for parsing command lines
You will notice the section where I'm mounting the additional partitions, if they have been defined.

Also note that I have set the default root as /dev/hda1 although my root is on /dev/sda1. This is intended to demonstrate the variable being replaced when it is passed at the boot command.

Creating the initramfs.igz file
Since I was editting the init file a lot and rebuilding the initramfs frequently, I decided to make a script instead. I called it geninitramfs.sh

The script is as follows:

#!/bin/bash
cd initramfs
find . | cpio -H newc -o > ../initramfs.cpio
cd ..
cat initramfs.cpio | gzip > initramfs.igz


Once you run this script from the work folder it will create a file initramfs.igz. Move/copy it to the /boot folder

$ mv initramfs.igz /boot/

You could have added this line to the geninitrams.sh script, but I chose not to.

Now add a new bootloader entry for this. I use LILO, so my entry in lilo.conf was as follows:


image = /boot/vmlinuz
initrd = /boot/initramfs.igz
root = /dev/sda1
label = Testopia
append = "home=/dev/sda6 etc=/dev/sda6 root=/dev/sda1"
read-only

If anyone uses grub and is following my post paste the grub entry and I'll add it here.

With this done I simple rerun the lilo command to install the changes.

Preparing the new /etc

To demo this, I need /etc on a different partition. So I moved my /etc contents to /home as it is a separate partition on my system. I used the following command to do this in order to preserve the permissions


$ cd /etc && tar -cf – . | (cd /home && tar -xpvf -)

After this I moved my /etc to /etc.old to remove the real /etc completely and made a blank directory called /etc


$ mv /etc /etc.old
$ mkdir /etc

With this done I rebooted the PC and selected Testopia as my boot choice from the Lilo prompt. The system booted completely with the /etc in a different partition.

Note: I did not have to touch my fstab for this and the newly mounted /etc wont be seen by the mount output.
Friday 26 October 2007

How to run apps that dont run on XGL desktop

You might encounter some apps that do not like XGL enabled desktop(for the less informed, aka Beryl, Compiz, Compiz-Fusion enabled desktops). Most often these are DirectX based Windows apps that you want to run through Wine or probably some Java App like Lazarus.

I found two different solutions with different approaches.

First approach:
Shift your present XGL enabled session into a separate Window and launch a nonXGL window manager on the main Xsession. I found this approach funny, but works.

Create this script and copy it to ~/bin for single user only or /usr/bin for global access. Give it a name like noxgl(u can change this to your liking)
#!/bin/sh

if [ "$1" = "-h" ] || [ "$1" = "--help" ] || [ $# -eq 0 ] ; then
echo "Usage : noxgl
[options]"
echo " noxgl -b
[options]"
echo " (-b option means 'border' so it adds a window border)"
exit
fi

if [ "$1" = "-b" ]; then
if [ -x /usr/bin/kwin ]; then
WM=kwin
else
WM=metacity
fi
DISPLAY=:0.0
$WM&
shift
$@
killall $WM
else
DISPLAY=:0.0 "$@"
fi


Now u can launch ur app as noxgl -b appname [options]

The second approach is to launch a nested Xserver using Xnest and launch ur app into the Xnest. You need to install Xnest for this.

Use the following commands:
Xnest -ac -terminate -geometry 1280x1024+0+0 :3 &

This will launch Xnest which is an Xserver as well as a Client.

Now launch ur app into this:
DISPLAY=:3 appname [options] &

A word of caution: By default Xnest will not allow Window borders, so it will be a hell to manage multiple windows(if your app uses them). So before launching ur app launch metacity using the above command and then launch ur app.

Thursday 25 October 2007

Migrating Your Windows Mozilla Thunderbird Profile to Linux

One of the most common tasks when migrating from Windows to Linux is making sure that your emails from ur Mozilla Thunderbird install are migrated properly. Here is a small HOWTO which I figured out myself, when faced with this task.

What you need to know?
Locations of the Profiles in Windows and Linux
On Windows its located in: "C:\Documents and Settings\UserName\Application Data\Thunderbird\Profiles\randomprofileid.default"

On Linux: ~/.mozilla-thunderbird


There is absolutely no need to copy your mails from windows to Linux partition. You can keep them where they are incase you do not plan to uninstall ur Windows OS or you frequently toggle between both OS like I do due to work requirements.

So here is what you do either copy your randomprofileid.default folder to the Linux partition or link it inside the ~/.mozilla-thunderbird folder.

Here is how you link it:
ln -s /media/WinPartition/Documents\ and\ Settings/Albuquerque/Application\ Data/Thunderbird/Profiles/okapp5e4.default/ ~/.mozilla-thunderbird/okapp5e4.default

Now you need to edit the profiles.ini file located at ~/.mozilla-thunderbird/profiles.ini
Here is the snippet from my Modified Profile

[General]
StartWithLastProfile=0

[Profile0]
Name=default
IsRelative=1
Path=lk3az1hf.default

[Profile1]
Name=Sam
IsRelative=1
Path=okapp5e4.default
Default=1

I added the new Profile 1 section in place and added the path to point to the one which is the one i linked above. Also changed StartWithLastProfile=1 to StartWithLastProfile=0 so that I would get a choice at startup.

Now start you firefox and you are done. Enjoy ur mails on both OS without any problems.

Tuesday 28 August 2007

Grub Background Image HOWTO

While answering this thread http://www.orkut.com/CommMsgs.aspx?cmm=141&tid=2551314922226675249 on Linux Community on Orkut, I said that it is possible to have the sexy boot screen like Fedora, RedHat and Debian on the Ubuntu and related ..buntu systems. I even pointed how, but had not tried myself although I was confident that it will work. So I set off to actually try it out.

Your Recipe:
A linux machine with Ubuntu/kubuntu/edubuntu/xubuntu installed
a 15 colour image to be used as background, Canvas size 640x480. Must be in xpm format

The preparation:
OK. the first question you will ask me is where to get a 15 colour image in xpm format from? My answer is simple. Google it or make it. I have tried both. But I will explain the making one.

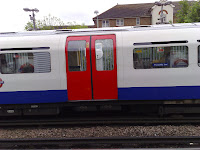
I used a photograph I had taken from my friend's N95 of the London Underground. It definitely was not 15 colour and particularly not 640x480. Click to see the original image. You may save it if you like. So the task was to convert it to the required format. I played with few commands like cjpeg, djpeg, etc till i found convert. After going through its options this is what i used:
shashank@shashank-laptop:~$ convert /media/hda3/Shashank\ pictures/09052007088.jpg -colors 15 -resize 640x480 underground.xpm

The command is pretty self explanatory. with the exact required options; -colors and -resize

The final product wasn't pretty impressive, but would suit my requirements. What else would you expect converting a 32bit image to a 15colour one. Can't upload the image so you have to experiment with the original image and the command to see what I got.

now gzip the image:
shashank@shashank-laptop:~$ gzip underground.xpm

move or copy the xpm.gz file to /boot/grub/ folder. You need to be root to do this, so use sudo

Modifying the grub:

Now we need to modify the grub configuration file. This is /boot/grub/menu.lst on the Ubuntu. Use your favourite editor. I love vi, some love nano, for others gedit. remember to be root or sudo your command
shashank@shashank-laptop:~$ sudo vi /boot/grub/menu.lst

Now add this below the timeout line:
splashimage=(hd0,1)/boot/grub/underground.xpm.gz

My Boot and / same the same partition and it is the second primary partition on my laptop. The first Primary partition is used by the laptops recovery utility which I have left as it is, just in case. You may need to figure out what you have to use in place of (hd0,1) according to your partitoning scheme.

Finally save exit and reboot to view the effect. Cheers.

Thursday 21 June 2007

Who Rules?

Some days back I was reading a Linux vs Windows debate on an Orkut Community. the debate started with this YouTube Video:


After reading half way through the posts, I decided I had to speak out my view, so I posted this:


Linux can perform these graphic wonders at a meagre 256MB RAM whereas Vista requires atleast a Gigabyte for its Aero which gives nothing..

For ppl who are saying Windows is more user friendly, u got to tell me why ppl are downgrading their machines back to XP from Vista? And all those guys praising Windows how many of you have actually bought a copy of Windows?? 90% of you are using a pirated copy.

Your praises are all because Windows has been shoved down your throat ever since u knew what a computer is. U have never known the power of linux. You have never know what freedom of choice is. U r stuck with daily dose of updates that fixes ur OS patches. U R stuck with just FAT and NTFS. U R stuck.

The Linux users have broken free from the bondage. The are free to choose.. free to innovate..

Everytime someone tried to speak the FACT they were ridiculed and laughed at until it was proved otherwise. TRuth Happens.. and it will be seen.

"First they ignore you..
then they laugh at you..
Then the fight you..
Then you win."
- mahatma Gandhi